
The Camera: - Connection Standard
Vehicles
Your camera
has a molded Black and Red wire

The red is to be connected to the positive side of the reverse light.
The Black is to be earthed not to the globe but to the body of the car.
If
you have the tailgate camera
The RCA has a small red wire next to
it.

This wire will be live when the car
is in reverse and so this red wire is connected to a BLUE wire on
the main wiring loom labeled BACK.
This will tell the unit when the car is in reverse.
Your camera has a green and a white
loop wire
The
GREEN
loop needs to be cut so you can be used as a reverse camera.
The white wire is cut to give you
grid lines. (this can be joined if you would like)
(there was one batch of cameras where
the colors were reversed )
If you have a specific factory fit camera
If your vehicle was supplied with a specific camera the you will have received this cable

The
Camera: - CANBUS Vehicles
You will have
received a short wire with red and black lead.

This lead is used as power for the camera will come from the head unit itself.
This cable is plugged into the socket next to the camera input.
If you have the tailgate camera
Your camera has a molded Black and Red
wire
 The ends of this wire
should be terminated so that
The ends of this wire
should be terminated so that
it cannot create a short in the unit
/ camera.
This red wire is now live when
the unit is on and is to be connected to the red wire next to the RCA

If you have a specific factory fit camera
If your vehicle was supplied with a specific camera the you will have received this cable

Black screen
trouble shooting:
If all is physically connected correctly and you get a black screen then trouble
shooting needs to be done to work out why you are getting a black camera image
to appear.
On standard
vehicles
1) Test the voltage
On some older cars the power wire to the reverse lights may
have suffered some power leakage resulting in less
than 13.8V at the rear. The camera will work at 12V but
it is not uncommon for some cars to only get say 9V.
At 9V the globes will work, the unit will still switch the
camera input but the camera itself will not be on.
If you are unsure one of the easiest places to get 12V is
from either the Red or Yellow wire powering the unit.
2) Camera not pushed in correctly
At the camera join to the reducer unplug and check to ensure
it it plugged in correctly
3) Plug the camera to the AUX input
There is a chance the socket is / cable are damaged.
Then from the main menu go to
Setting
General
Reverse detection. Turn this off.
Then put the vehicle into reverse and the black screen will
no longer display but the camera should still be powered.
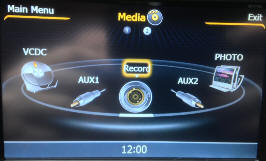
Next from the Main Menu select
Media
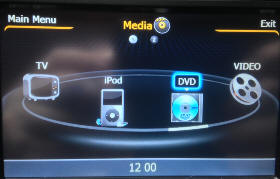
The press the no 2 buttons (At the top of the screen -just
under where is says Media)

Select the AUX input and see if the image is coming from the
camera
4) If all the above are checked and tested its time to
replace the camera.
On
CANBUS vehicles
1) Camera not pushed in
correctly
At the camera join to the reducer
unplug and check to ensure it it plugged in correctly
2) If you have used a filter then
by pass this to eliminate this as the problem
3) There is a chance the socket is / cable are damaged.
Plug the camera to the AUX input
Next from the Main Menu select
Media

The press the no 2 buttons (At the
top of the screen -just under where is says Media)
Select the AUX input and see if the
image is coming from the camera
4) If all the above are checked and tested its time to replace the camera.